[1]
Windows 10 評定與部署套件 (Assessment and Deployment Kit, ADK)
其中有一部分是說DISM部署映像服務與管理(Deployment Imaging and Servicing Management)的
請先參考http://yucharles54.blogspot.tw/2015/11/windows-10-adk-10.html
然後再看
DISM 部署映像服務與管理(Deployment Imaging and Servicing Management) 技術參考
部署映像服務與管理 (DISM) 是在部署前用來掛接和服務 WindowsR 映像的命令列工具。您可以使用 DISM 映像管理命令來掛接 Windows 映像 (.wim) 檔案或虛擬硬碟 (VHD) 以及取得相關資訊。您也可以使用 DISM 來擷取、分割和管理 .wim 檔案。
WindowsR 8 中的 ImageX 工具已經過時,而且已經用 DISM 取代來管理映像。
您也可以使用 DISM 來安裝、解除安裝、設定和更新 Windows 功能、套件、驅動程式,以及 .wim 檔案中的國際設定或使用 DISM 服務命令的 VHD。
DISM 概觀 (部署映像服務與管理) 描述 DISM 系統需求、優點、常見的服務與管理案例以及限制。
https://msdn.microsoft.com/zh-tw/library/hh825236.aspx
DISM 使用方法主題 (部署映像服務與管理) 提供使用 DISM 的 how-to 指示。
https://msdn.microsoft.com/zh-tw/library/hh825176.aspx
DISM 參考 (部署映像服務與管理) 提供 DISM 的參考資訊,包括命令列選項、最佳做法及支援的平台。
https://msdn.microsoft.com/zh-tw/library/hh824915.aspx
[2]
若你只想做簡單的加入一些驅動,可能只要知道部分的DISM就可以了,但要更完整就需ADK了。
如下只是擷取部分的DISM:
DISM
https://drive.google.com/file/d/0Bzaa1aYBHo7NbENpdFNJd1NkcmM/view?usp=sharing
Dism++Beta 10.1.2.2(內含Dism++幫助文檔——2015-09-03.mht繁體版)
https://drive.google.com/file/d/0Bzaa1aYBHo7NRGRGZ2hmbC1jbkk/view?usp=sharing
GUI for Dism 6.2 (Win8)
在dism內

DISM GUI 4.0
在dism內
關於DISM ++ (最新WinSxS清理.CompactOS壓縮工具)請看:
http://www.mobile01.com/topicdetail.php?f=300&t=3757708
我對DISM ++ 清理功能不是很樂觀,對圖形介面可能較吸引我
windows 7 c:(SSD)列出一大堆要清理:

結果只是25k,哈哈!,可備份與還原!但似乎無法取代DISM,我還是要用DISM與DISM GUI 。

在做 Windows Update 更新時,都會在 WinSxS 資料夾留下一份備份檔,隨著更新次數增加,也累積了非常多的備份檔,但 Windows 內附的磁碟清理並沒有辦理清理這些備份檔案,這時候可以利用 dism 指令來做清理的動作。online是指開機使用中的系統,用以區別offline。
主要目的是:以系統管理員身分執行
主要目的是:以系統管理員身分執行
Dism /online /Cleanup-Image /StartComponentCleanup /ResetBase
或者你可參考的方式清理:
http://www.sevenforums.com/tutorials/122262-windows-7-sp1-disk-cleanup-tool.html
[3]
boot.wim 及 install.wim 分別的功能是?
舉例如 : Windows 7 Os的啟動過程
1.Systemis powered on
2.The MBR is located on the system drive.
3.The Boot Sector is located, BOOTMGR is loaded
4.BOOTMGR looks for an active partition on sector 0.
5.BOOTMGR then reads the BCD file
6.BOOTMGR transfers control to WINLOAD.EXE contained in Boot.wim
(In the case of a resume operation, WINRESUME.EXE)
7.WINLOAD.EXE initializes memory and loads drivers set to start at boot, and then transfers
control to the kernel.
Install.wim contains several sysprepped images of Windows 7, ready to be deployed.
The setup process extracts the wim to the drive.
Windows 7 並沒有內建原生的 USB 3.0 驅動程式,當只有USB 3.0的port時,mouse與keyboard都不能用,那要如何安裝?(看看你主機板是否有ps/2的接頭?)
因此我們知道主機板提供之 USB 3.0 驅動程式,必須都加入boot.wim 及 install.wim 中,
但是所謂的windows 7主機板 patch ,實際上有沒加到boot.wim 及 install.wim 中,請自行檢察。我不知道?加入了沒有憑證也是枉然。(驅動要有MS認證)
這不一定是沒驅動的關係,應該要看主機板的BIOS能否正確的模擬出來usb 2.0 or ps/2的動作?
沒DOS的原生驅動,不模擬是不會動作的。(接在usb 3.0的mouse與keyboard,要變成ps/2?不知)
很好笑都甚麼時代了,還要PC AT的裝置,真是越活越回去了(PS/2的東東)
總之還好我沒買skylake的主機板,要自備ps/2 mouse or keyboard,這不是花錢來買罪受的!
這裡再次強調Skylake平台缺點
1. 接USB 3.0 port的mouse與keyboard,能不能模擬成 ps/2 mouse與keyboard,這完全是 BIOS問題(主機板的問題)
2. 沒DOS的原生驅動下, 接USB 3.0 port的mouse與keyboard若不模擬也不能用。(intel晶片組的問題)
Boot.wim是有 2 index:
index 1 winpe
index 2 windows setup

所以指令:
dism /mount-wim /wimfile:boot.wim /index:2 /mountdir:mount
dism /image:mount /add-driver:"usb3" /recurse
dism /image:mount /Get-Drivers /all >text1.txt (輸出driver list to text1.txt來參考)
dism /unmount-wim /mountdir:mount /commit
install.wim 中
dism /Get-WimInfo /WimFile:install.wim
得知
Image Index: 1 Windows 7 HOMEBASIC
Image Index: 2 Windows 7 HOMEPREMIUM
Image Index: 3 Windows 7 PROFESSIONAL
Image Index: 4 Windows 7 ULTIMATE
所以for Windows 7 ULTIMATE 指令:
dism /mount-wim /wimfile:install.wim /index:4 /mountdir:mount
dism /image:mount /add-driver:"usb3" /recurse
dism /unmount-wim /mountdir:mount /commit
如何檢查USB 3.0 驅動程式是否加入?
我用DISM GUI 來試驗


別忘了dismount

DISM /Export-Image /SourceImageFile:install.wim /SourceIndex:1
/DestinationImageFile:install2.wim
後記:
有人用自製 Windows 8.1/Windows 7 整合光碟
https://samantw.com/gimagex-win7-win81-all-in-one/
用 Windows 8.1 光碟(有原生支援 USB 3.0)整合Windows 7,
成功讓Windows 7能原生支援 USB 3.0 安裝。
這是另一方式,但還是先要patch install.wim,才能在部署後支援USB 3.0 。
這幾年我一直都使用華擎主機板,PS/2解決方案也有點可笑了,還有多少人要為這爛晶片組(Skylake),去買古董裝置來用,又要置電競裝置於何處?但USB BOOT獨立選項,這是我最最愛的,也一直在使用他。
經實驗我用windows 10來整合(原生支援 USB 3.0+USB 3.1),再專文討論。
自製 Windows 7 + Windows 8.1+windows 10 整合安裝隨身碟
http://yucharles54.blogspot.tw/2015/11/windows-7-windows-81windows-10.html
[4]WinPE: Mount and Customize
Common customizations:
• Add device drivers (.inf files)
Mount the Windows PE image
Dism /Mount-Image /ImageFile:"D:\WinPE_x86\media\sources\boot.wim" /index:1 /MountDir:"D:\WinPE_x86\mount"
Add the device driver to the Windows PE image.
Dism /Add-Driver /Image:"D:\WinPE_x86\mount" /Driver:"D:\SampleDriver\driver.inf"
Verify that the driver packages are part of the image:
Dism /Get-Drivers /Image:"D:\WinPE_x86\mount"
Unmount the Windows PE image.
Dism /Unmount-Image /MountDir:"D:\WinPE_x86\mount" /commit
Create bootable media, such as a USB flash drive.
MakeWinPEMedia /UFD D:\WinPE_x86 I:
• Add optional components (packages or .cab files)
Dism /Add-Package /Image:"d:\WinPE_x86\mount" /PackagePath:"D:\Windows Kits\10\Assessment and Deployment Kit\Windows Preinstallation Environment\x86\WinPE_OCs\WinPE-HTA.cab"
Dism /Add-Package /Image:"d:\WinPE_x86\mount" /PackagePath:"D:\Windows Kits\10\Assessment and Deployment Kit\Windows Preinstallation Environment\x86\WinPE_OCs\zh-tw\WinPE-HTA_zh-tw.cab"
::如加入WinPE-WDS-Tools
:: WinPE-WDS-Tools includes APIs to enable the Image Capture tool and a multicast scenario
:: that involves a custom Windows Deployment Services client.
:: It must be installed if you intend to run the Windows Deployment Services client
:: on a custom Windows PE image.
dism /Add-Package /Image:"D:\WinPE_x86\mount" /PackagePath:"D:\Windows Kits\10\Assessment and Deployment Kit\Windows Preinstallation Environment\x86\WinPE_OCs\WinPE-WDS-Tools.cab"
dism /Add-Package /Image:"D:\WinPE_x86\mount" /PackagePath:"D:\Windows Kits\10\Assessment and Deployment Kit\Windows Preinstallation Environment\x86\WinPE_OCs\ZH-TW\WinPE-WDS-Tools_ZH-TW.cab"
最後有:List of Optional Components
https://technet.microsoft.com/en-us/library/hh824926.aspx
• Add a language
如加入zh-tw:
Dism /Add-Package /Image:"D:\WinPE_x86\mount" /PackagePath:"D:\Windows Kits\10\Assessment and Deployment Kit\Windows Preinstallation Environment\x86\WinPE_OCs\zh-tw\lp.cab"
Dism /Add-Package /Image:"D:\WinPE_x86\mount" /PackagePath:"D:\Windows Kits\10\Assessment and Deployment Kit\Windows Preinstallation Environment\x86\WinPE_OCs\zh-tw\WinPE-HTA_zh-tw.cab"
Dism /Add-Package /Image:"D:\WinPE_x86\mount" /PackagePath:"D:\Windows Kits\10\Assessment and Deployment Kit\Windows Preinstallation Environment\x86\WinPE_OCs\WinPE-FontSupport-ZH-TW.cab"
Dism /Set-AllIntl:zh-tw /Image:"C:\WinPE_x86\mount"
• Add a startup script or a Winpeshl.ini ScriptBy default, Windows PE includes a Startnet.cmd script located at
%SYSTEMROOT%\System32 of your customized Windows PE image.
Startnet.cmd starts Wpeinit.exe.
Wpeinit.exe installs Plug and Play devices, processes Unattend.xml settings, and loads network resources.
例如:
wpeinit –unattend:"x:\Unattend.xml"
就是將Unattend.xml放在於systemdriver下
[img]http://i1327.photobucket.com/albums/u661/yucharles/Snap43_zpszdxyixwk.jpg[/img]
請詳參考
https://technet.microsoft.com/en-us/library/hh825191.aspx
Winpeshl.ini內容如下
[LaunchApps]
"%systemdrive%\Program Files\mydir\app.exe"
• Add an app
md "D:\WinPE_x86\mount\windows\<MyApp>"
Xcopy C:\<MyApp> "D:\WinPE_x86\mount\windows\<MyApp>"
• Add temporary storage (scratch space)
Windows PE reserves memory on the X: drive to unpack the Windows PE files, plus additional temporary file storage, known as scratch space, that can be used by your applications. By default, this is 512MB for PCs with more than 1GB of RAM, otherwise the default is 32MB. Valid values are 32, 64, 128, 256, or 512:
Dism /Set-ScratchSpace:128 /Image:"D:\WinPE_x86\mount"
• Replace the background image
Change the security permissions of the Windows PE background image file (\windows\system32\winpe.jpg). This allows you to modify or delete the file.
• Add answer file settings
詳參考
https://technet.microsoft.com/en-us/library/hh825191.aspx
• WinPE how to add registry keys ?
In startnet.cmd
reg add
[5]WinPE 範例研究
Hard Disk Manager 15 Premium 10.1.25.772 WiN10 Advanced Recovery CD x86x64
https://kat.cr/paragon-hard-disk-manager-15-premium-10-1-25-772-win10-advanced-recovery-cd-x86x64-retail-iso-deepstatus-t11039631.html


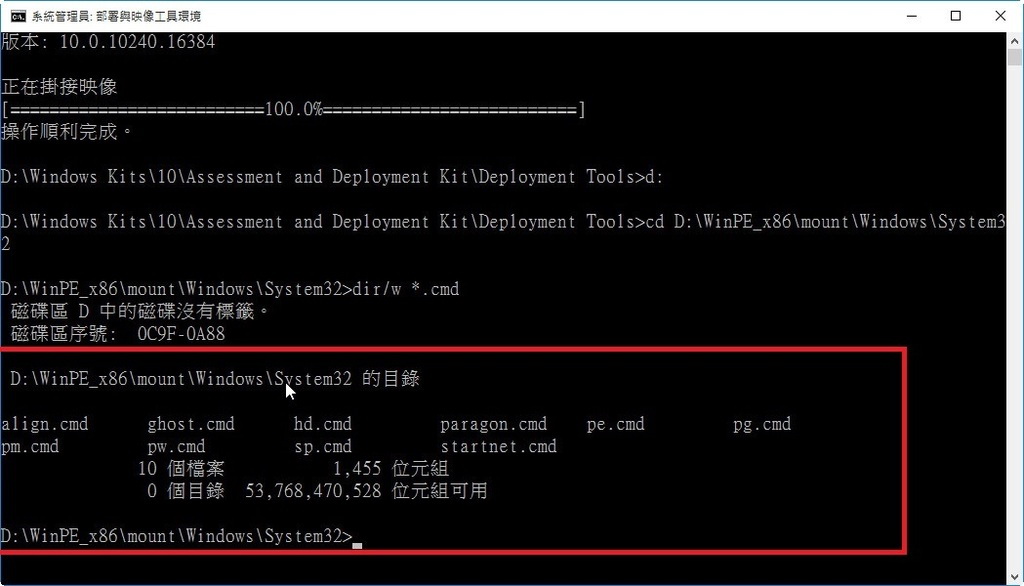
Command line that ran is dism.exe /image:M:\mount /Get-Packages
Deployment Image Servicing and Management tool
Version: 10.0.10240.16384
Image Version: 10.0.10240.16384
Packages listing:
Package Identity : Microsoft-Windows-WinPE-LanguagePack-Package~31bf3856ad364e35~amd64~en-US~10.0.10240.16384
State : Install Pending
Release Type : Language Pack
Install Time : 2015/7/30 上午 07:55
Package Identity : Microsoft-Windows-WinPE-Package~31bf3856ad364e35~amd64~~10.0.10240.16384
State : Install Pending
Release Type : Foundation
Install Time : 2015/7/10 上午 10:31
Package Identity : WinPE-FMAPI-Package~31bf3856ad364e35~amd64~~10.0.10240.16384
State : Install Pending
Release Type : Feature Pack
Install Time : 2015/7/30 上午 07:55
Package Identity : WinPE-SecureStartup-Package~31bf3856ad364e35~amd64~en-US~10.0.10240.16384
State : Install Pending
Release Type : Language Pack
Install Time : 2015/7/30 上午 07:55
Package Identity : WinPE-SecureStartup-Package~31bf3856ad364e35~amd64~~10.0.10240.16384
State : Install Pending
Release Type : Feature Pack
Install Time : 2015/7/30 上午 07:55
Package Identity : WinPE-WMI-Package~31bf3856ad364e35~amd64~en-US~10.0.10240.16384
State : Install Pending
Release Type : Language Pack
Install Time : 2015/7/30 上午 07:55
Package Identity : WinPE-WMI-Package~31bf3856ad364e35~amd64~~10.0.10240.16384
State : Install Pending
Release Type : Feature Pack
Install Time : 2015/7/30 上午 07:54
The operation completed successfully.
這是完全support of GPT/uEFI boot
startnet.cmd內容
最後執行explauncher.exe
你可自行修改這x86與x64兩版內容,整合下一例的東西
--------------------------------------------------------------------------------
@echo off
wpeinit
rem reg for NTLM
reg add "HKEY_LOCAL_MACHINE\SYSTEM\CurrentControlSet\Control\Lsa" /v lmcompatibilitylevel /t reg_dword /d 00000001 /f
rem start silent.exe for configure hardware
cd "%systemdrive%\programs\Paragon Software\program"
ren esxwrap2.dll esxwrap2_.dll
cd "%systemdrive%\programs\Paragon Software\program"
ren esxwrap.dll esxwrap_.dll
cd "%systemdrive%\Programs\Paragon Software\program"
move cxplugins cxplugins_
%systemdrive%\custom\Runner\silent.exe
rem echo Stop windows firewall and related services
net stop MpsSvc > %WinDir%\temp\log.log
net stop IKEEXT > %WinDir%\temp\log.log
net stop BFE > %WinDir%\temp\log.log
rem echo Parse \custom storage
if not exist %systemdrive%\custom goto continue
cd /D %systemdrive%\custom
:interfaces
ipconfig /all > lans.lst
if errorlevel 1 goto error
:netconfig
echo apply settings for network adapters
set NETWORK_MANUAL_FLAG=false
if exist network.ini (
call netcfg.bat
) else (
echo start network manually
set NETWORK_MANUAL_FLAG=true
cd "%systemdrive%\programs\Paragon Software\program"
call netconfig.exe
cd /D "%systemdrive%\custom")
if errorlevel 1 goto error
:mount
rem echo mount shared folder if it's defined in configuration
cd /D %systemdrive%\custom
if exist share.bat (
call share.bat
) else if "%NETWORK_MANUAL_FLAG%"=="false" (
echo start mount network share manually
cd "%systemdrive%\programs\Paragon Software\program"
call netconfig.exe
cd /D "%systemdrive%\custom")
if "%MC_SHARED_FOLDER%"=="" goto continue
if "%MC_USER%"=="" goto guest
:user
rem echo mount command : net use Z: "%MC_SHARED_FOLDER%" /USER:"%MC_USER%"
start /MIN net use Z: "%MC_SHARED_FOLDER%" /USER:"%MC_USER%" "%MC_PASSWORD%"
if errorlevel 1 goto error
goto continue
:guest
rem echo mount command : net use Z: %MC_SHARED_FOLDER%
start /MIN net use Z: "%MC_SHARED_FOLDER%"
:error
echo Error occurred
:continue
cd /d %systemdrive%\windows\system32
set flag=
diskpart /s diskpart_script.txt >out1.txt
FIND /I "winpe" out1.txt > out2.txt
FOR /F "tokens=2,3*" %%i in (out2.txt) do (
if not "%%j"=="" ( set flag=%%j
goto do_autotest
)
)
:do_autotest
rem verify gate for autotest
if not "%flag%"=="" (
if EXIST "%flag%:\ParagonAutoTest1234\autotest4321.cmd" (
%flag%:\ParagonAutoTest1234\autotest4321.cmd %flag%
goto end
)
)
rem cd /D X:\Programs\
rem echo ####exit >X:\Programs\splash_mes.txt
cd "%systemdrive%\programs\Paragon Software\program"
echo Start ExpLauncher
explauncher.exe
:end
--------------------------------------------------------------------------------
[6]WinPE 範例研究
download winpe 10 v10.0.10240.16384 x86 eng :
https://kat.cr/winpe-10-v10-0-10240-16384-t11458222.html

To identify the Windows PE release that you are running
--------------------------------------------------------------------------------
1. At a Windows PE command prompt, type regedit
2. Locate this registry key:
HKEY_LOCAL_MACHINE\SOFTWARE\Microsoft\Windows NT\CurrentVersion\WinPE
The Version registry value shows the Windows PE version
1. Paragon Hard Disk Manager 15 (v10.1.25.772) Professional:
http://www.paragon-software.com/home/hdm-professional/
2. Symantec Ghost 12.0.0.8010 Corporate Edition:
http://en.wikipedia.org/wiki/Ghost_(software)
3. StorageCraft ShadowProtect 5.2.4.37298:
http://www.storagecraft.com/products/overviews/storagecraft-shadowprotect
4. Paragon Alignment Tool 4.0 Professional:
http://www.paragon-software.com/home/partition-alignment/
5. HDClone 6.0.5 Enterprise Edition:
http://www.miray.de/products/sat.hdclone.html#ente
6. EaseUS Todo Backup 8.8:
http://www.todo-backup.com/business/advanced-server-backup.htm
先copype x86 D:\WinPE_x86
建立完整目錄,再將w10pe_x86_en.iso中\sources\boot.wim copy至D:\WinPE_x86\media\sources\下
取代原先的boot.wim
接著
Dism /Mount-Image /ImageFile:"D:\WinPE_x86\media\sources\boot.wim" /index:1 /MountDir:"D:\WinPE_x86\mount"
這時可觀看
在windows/system32下startnet.cmd內容,大概就知道在做甚麼
------------------------------------------------------------
@echo off
wpeinit
:start
echo.
echo.
echo.
echo.
echo.
echo.
echo.1. Paragon Hard Disk Manager 15 (v10.1.25.772) Suite GUI:
echo.
echo.2. Paragon Hard Disk Manager 15 (v10.1.25.772) Suite:
echo.
echo.3. Symantec Ghost 12.0.0.8010 Corporate Edition:
echo.
echo.4. StorageCraft ShadowProtect v5.2.4.37298:
echo.
echo.5. Paragon Alignment Tool 4.0 Professional:
echo.
echo 6. HDClone 6.0.5 Enterprise Edition:
echo.
echo.7. EaseUS Todo Backup 8.8:
echo.
echo 8. Quit
echo.
echo.
echo.
echo.
choice /n /c:123456789 Select Number(1,2,3,4,5,6,7 or 8)
if %errorlevel%==8 goto quit
if %errorlevel%==7 goto pe
if %errorlevel%==6 goto hd
if %errorlevel%==5 goto align
if %errorlevel%==4 goto sp
if %errorlevel%==3 goto ghost
if %errorlevel%==2 goto pg
if %errorlevel%==1 goto gui
:gui
cls
paragon
goto quit
:pg
cls
pg
goto quit
:ghost
cls
ghost
goto quit
:sp
cls
sp
goto quit
:align
cls
align
goto quit
:hd
cls
hd
goto quit
:pe
cls
pe
goto quit
:quit
cls
------------------------------------------------------------------------
paragon.cmd :
------------------------------------------------------------------------
@echo off
"%systemdrive%\programs\Paragon Software\program\explauncher.exe"
------------------------------------------------------------------------
最後
Dism /Unmount-Image /MountDir:"D:\WinPE_x86\mount" /commit
完成後,再寫入隨身碟
MakeWinPEMedia /UFD D:\WinPE_x86 i:
------------------------------------------------------------------------
[7]WinPE 範例研究
Active@ Data Studio 10.1.0.0 + Key
(windows 8.1 winpe)
https://kat.cr/active-data-studio-10-1-0-0-key-t11419895.html
Rufus v2.5
http://rufus.akeo.ie/
首先安裝軟體在\Program Files\LSoft Technologies\Active@ Data Studio之下
選Active@Boot Disk,建立新的Boot Disk


由新的BootDisk.ISO中,先mount BootDisk.ISO,再取出boot.wim
由DismGui mount boot.wim

修改BOOTDISK.KEY

unmount

更新BootDisk.ISO內的boot.wim
由Rufus v2.5做成usb boot disk


------------------------------------------------------------------------
WinPE 版本
6.1.7600.xxxxx
|
WinPE 3
|
6.2.9200.xxxxx
|
WinPE 4
|
6.3.9600.xxxxx
|
WinPE 5
|
沒有留言:
張貼留言
注意:只有此網誌的成員可以留言。